
By Graham Fry, International Welding Engineer
To read a weld symbol, find the standard the drawing was produced to, then read from the arrow: below the line is the arrow side, above is the other side, the size sits left of the weld symbol, length and spacing sit to its right, and the process goes in the tail. In Australia that standard is AS 1101.3, now the 2026 edition. Plenty of drawings on Australian jobs are drawn to AWS A2.4 or ISO 2553 instead, and the same marks don’t always ask for the same weld.
Most symbol mistakes aren’t about the shapes. Everyone knows the triangle is a fillet. The expensive mistakes come from the number after the hyphen, the side of the line a symbol sits on, a letter in the tail, and a dashed line nobody noticed.
This guide reads the symbol the way a fabricator, supervisor or inspector has to read it: in order, against the right standard, with the gaps called out. If you want to check a symbol as you go, photograph it, or screenshot it off the PDF, and drop it into our free Weld Symbol Decoder. It draws the preparation and the welded joint, and spells out what the symbol calls for to AS 1101.3:2026 or AWS A2.4:2020.
First, find out which book the drawing was drawn to
Call it the ‘which book’ rule. Before you read a single symbol, find the standard the drawing was produced to. The title block or the general notes usually name it. If they don’t, ask. It’s the cheapest question on the job. It’s also the one setting on the decoder that changes the answer: the same symbol decoded to AS 1101.3 and to AWS A2.4 can come back as two different welds.
Three systems turn up on Australian jobs:
- AS 1101.3 is the Australian standard. One reference line, arrow side below and other side above. The 2026 edition supersedes AS 1101.3-2005 (R2018), and a lot of drawings and training notes in circulation still follow the 2005 edition. Work to the edition your contract names.
- AWS A2.4:2020 is the American standard. AS 1101.3 follows the same single reference line layout, and most symbols read the same way. Most North American drawings and a lot of oil and gas work use it.
- ISO 2553:2019 is the international standard, common on European and Asian drawings. It has two systems: System A uses a solid reference line with a dashed line beside it, and System B uses a single line the same way AWS does. A drawing must not mix the two.
The quick tells:
| What you see on the drawing | It is most likely |
|---|---|
| A dashed line running beside the reference line | ISO 2553, System A |
| a or z in front of a fillet weld size | ISO 2553 |
| An intermittent weld written as 3 × 50 (150) | ISO 2553 |
| CP in the tail | AS 1101.3 |
| CJP in the tail | AWS A2.4 |
| A backing rectangle marked M or MR | AS 1101.3 or ISO 2553 |
| A backing rectangle with R inside it | AWS A2.4 |
| A diameter sign in front of a plug weld size | AWS A2.4 |
| Sizes in inch fractions | AWS A2.4 |
The parts of a weld symbol
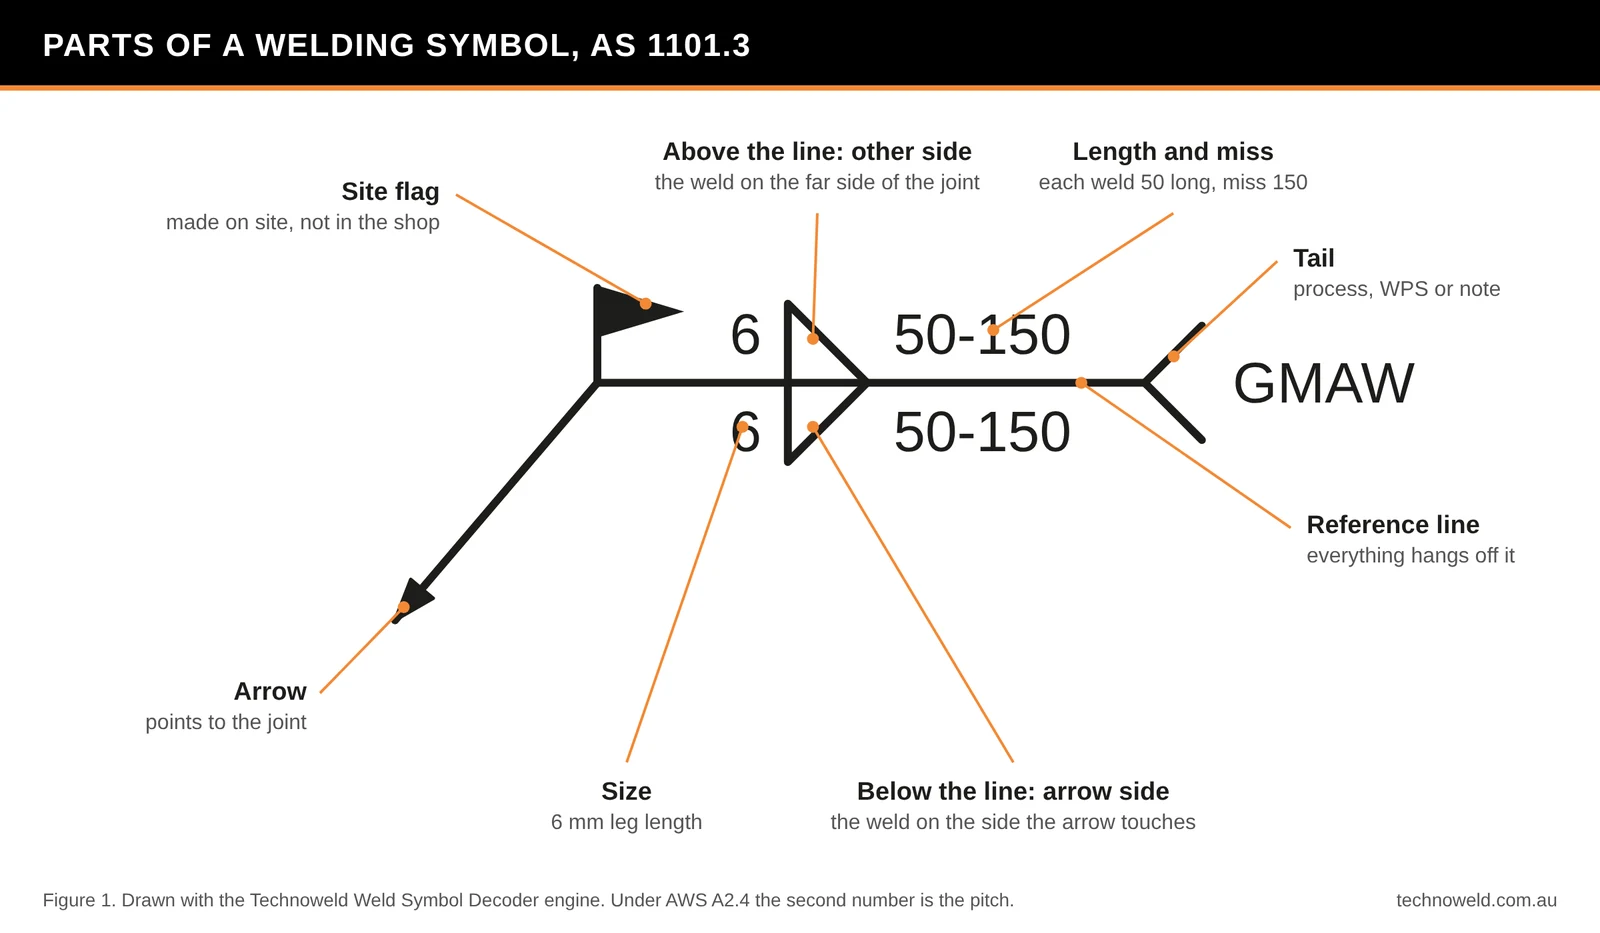
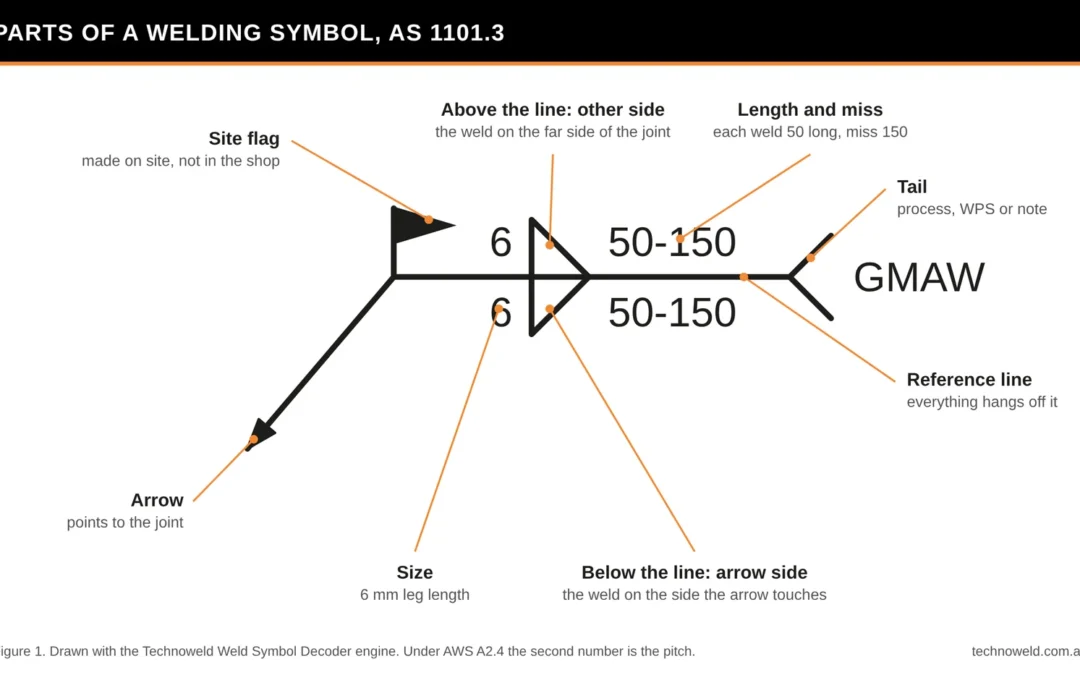
The whole assembly is the welding symbol. The small shape on the line is the weld symbol, and it says what type of weld is wanted. Around it:
- Reference line. The horizontal line everything hangs off.
- Arrow. Points to the joint. The side it touches is the arrow side.
- Size. Left of the weld symbol.
- Length, then the spacing for an intermittent weld. Right of the weld symbol.
- Root gap and angle. On a butt weld, the gap is written inside the symbol and the angle just outside it.
- Supplementary symbols. The all-round circle and the site flag at the bend of the arrow, and the contour mark and finish letter outboard of the weld symbol.
- Tail. The process, a WPS number or another reference. Left off when there’s nothing to say.
The decoder page keeps a one-screen version of these rules, plus the abbreviations you’ll meet in tails and legends, under How to read a weld symbol and Abbreviations.
Arrow side and other side
Below the line is the arrow side. Above the line is the other side. Symbols on both sides mean weld both sides. That holds under AS 1101.3, AWS A2.4 and ISO System B, and it doesn’t change when the arrow is drawn off the right-hand end of the line instead of the left.
Two things catch people.
The cranked arrow
On a bevel or J preparation only one member gets cut. A crank (AS) or break (AWS) in the arrow points to the member that gets prepared. No crank means the drawing doesn’t care which one, and the choice is yours. Make it on purpose and write it down.
ISO System A
Here the side is set by which line the symbol sits on, not by above or below. A symbol on the solid line is arrow side. A symbol on the dashed line is other side. The dashed line can be drawn above or below the solid one. When it sits below, which is the layout ISO prefers, reading it the AS 1101.3 way gets the side wrong.
Fillet weld symbols
The number left of the triangle is the leg length under both AS 1101.3 and AWS A2.4. A 6 is a 6 mm leg. No length on the right means the weld runs the full length of the joint.
Unequal legs are written as two sizes, 6 × 10. The symbol doesn’t say which leg goes on which member. The drawing has to show it, and if it doesn’t, that’s an RFI, not a guess.
ISO is different. The size carries a letter. z is leg length. a is throat thickness. For an equal-leg fillet at 90°, the throat is 0.707 of the leg, so an a6 is about an 8.5 mm leg. Weld metal goes with the square of the leg, so an a6 holds roughly twice the metal of a 6 mm leg fillet. Read an a6 as a 6 mm leg and you have put in half the weld metal and about 70% of the design throat. ISO 2553:2019 requires the letter, so a bare number on an ISO drawing isn’t something to guess at either. The full comparison is in AS 1101.3 vs ISO 2553: The Fillet Weld Number That Catches People Out.
One more for Australian work: a designer’s calculation to AS 4100 is often done on the design throat. The symbol you receive still carries the leg.
Stitch welds: the 50-150 trap
An intermittent fillet, a stitch weld on most Australian floors, carries two numbers right of the triangle: the length of each weld, a hyphen, then a second number. That second number is where the standards part company.
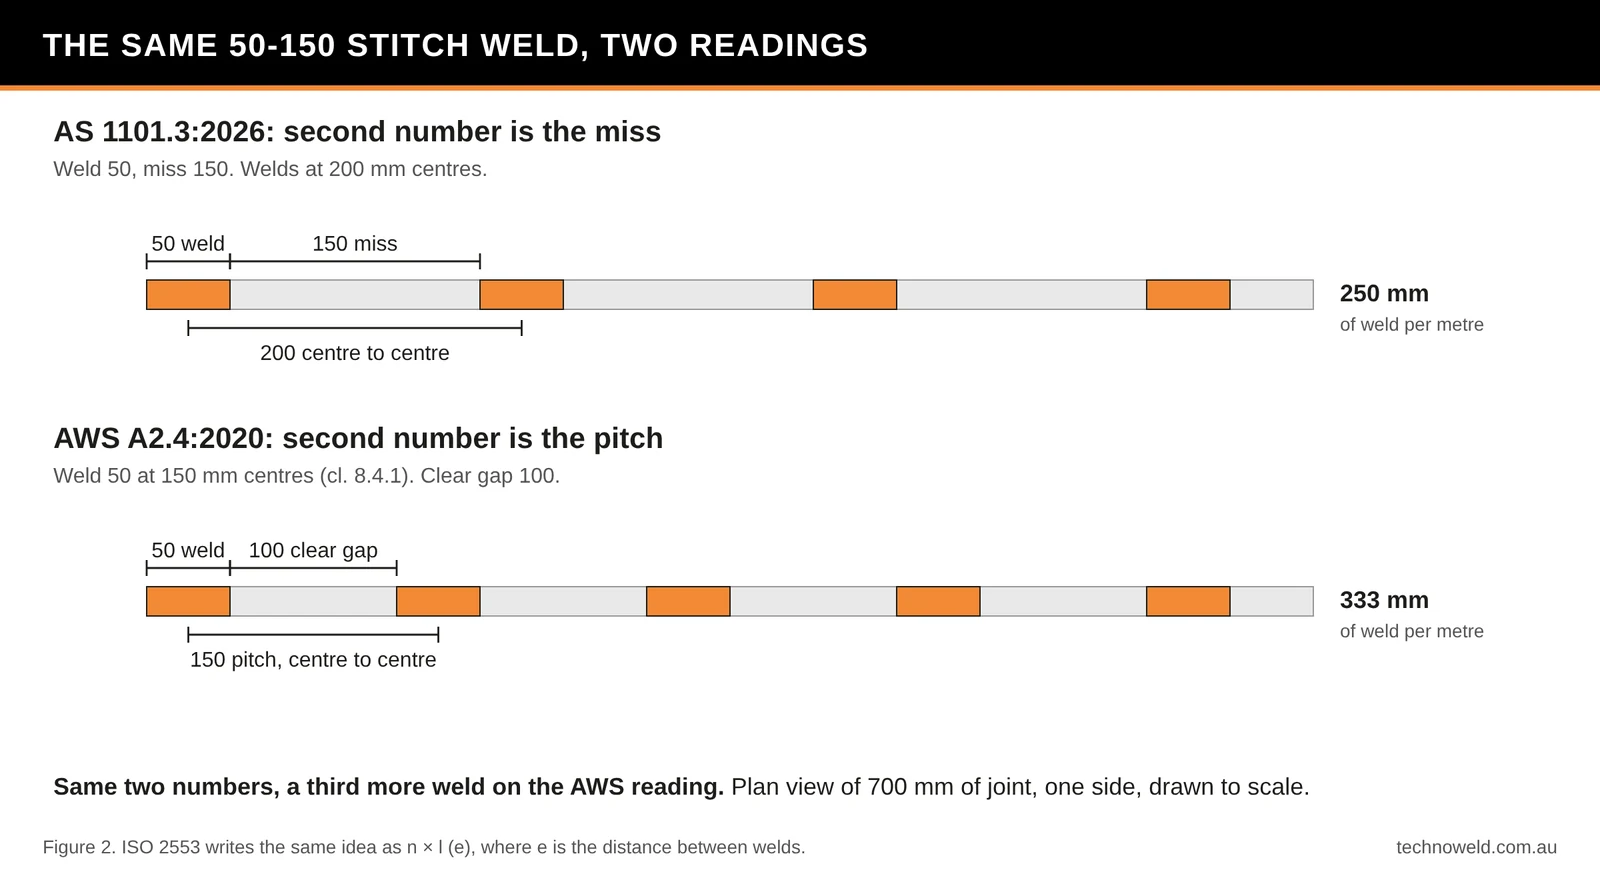
- Under AWS A2.4:2020 the second number is the pitch, centre to centre (clause 8.4.1). 50-150 is a 50 mm weld every 150 mm, so the clear gap is 100 mm.
- Under AS 1101.3:2026 the second number is the miss, the unwelded space between welds. 50-150 is weld 50, miss 150, so the welds sit at 200 mm centres. The 2005 edition read it as pitch, which is why older Australian drawings, CAD blocks and training notes say otherwise.
- ISO 2553 writes it as n × l (e): n welds, each l long, with e the clear distance between one weld and the next. Close to the AS 1101.3:2026 reading, written a different way.
Run the numbers on a 6 m member welded both sides. The AWS reading puts down about 4.0 m of weld. The AS 1101.3:2026 reading puts down about 3.0 m. A third more weld, a third more consumable and a third more arc time, from the same two numbers.
Symbols directly opposite each other across the line mean chain intermittent: the welds sit opposite each other. Symbols offset along the line mean staggered.
And on anything that sees cyclic load or weather, ask whether the stitch weld is a design decision or a drafting habit. Every stop and start is a crater and a toe. That’s a question for the engineer, not the welder, but somebody has to ask it.
Butt welds: full penetration, partial penetration and the brackets
A butt weld symbol with no depth and no size means complete penetration through the full thickness of the joint, under AS 1101.3 and AWS A2.4 (clause 7.2.2). CP in the tail of an AS 1101.3 symbol, or CJP in the tail of an AWS symbol, asks for complete penetration and leaves the preparation to the fabricator’s WPS.
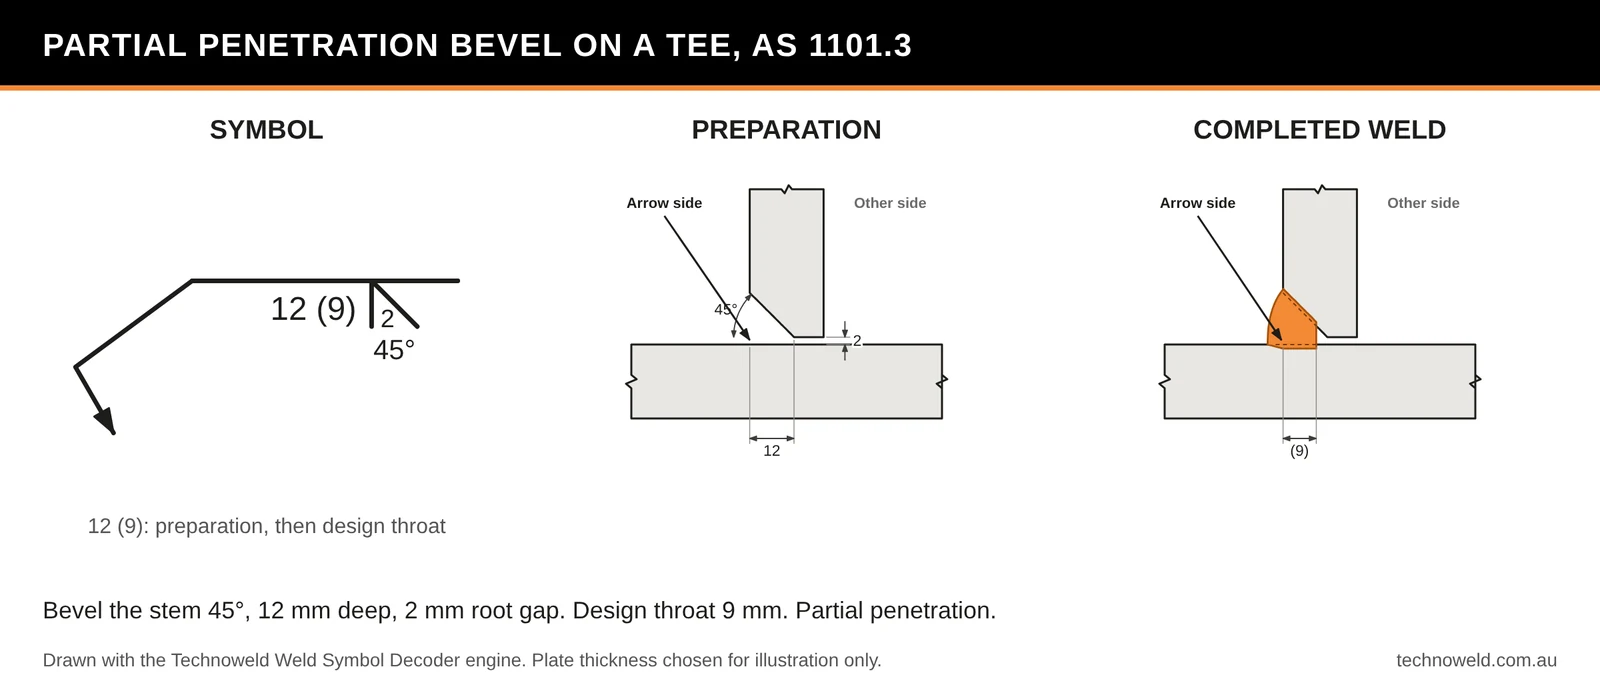
When numbers do appear left of the symbol, the one in front is the depth of preparation and the one in brackets is what the weld has to deliver: the design throat under AS 1101.3, the weld size under AWS A2.4.
- 12 (9) on a 45° bevel: cut the preparation 12 mm deep, and the weld must give a 9 mm design throat. On a 45° preparation the throat you can count on is less than the depth you cut, which is why the two numbers differ.
- (8) on its own: a partial penetration weld of 8 mm, with the preparation depth left to you.
- A depth with no bracket: under AS 1101.3 the throat is specified elsewhere on the drawing. Under AWS A2.4 the weld size is not less than the depth (clause 7.2.7).
The letters are where people trip. AS 1101.3 writes it as S (D): S the depth of preparation, D the design throat. AWS A2.4:2020 writes it as D (S): D the groove depth, S the weld size. On an Australian drawing legend S is the preparation. On an American one S is the weld. The numbers on the drawing read the same way. The legend doesn’t.
A fillet drawn outboard of the butt weld symbol on a tee or corner joint is a reinforcing fillet over the butt weld. Same line, same side, read together.
Double-sided full penetration welds, a double V or a K on a tee, show the butt symbol on both sides of the line with no sizes. Whether the root is back gouged and back welded comes from the WPS or a note in the tail, not the symbol.
ISO reads a lone number left of a butt symbol as the penetration depth, the weld rather than the preparation, and uses h and s when it gives both. More on that in AS 1101.3 vs ISO 2553.
The root gap goes inside the symbol and the included angle outside it. The root face and the radius of a U or J preparation never go on the symbol. They come from a detail or the WPS.
Backing, back welds and melt-through
A rectangle opposite a butt weld symbol is backing. AS 1101.3 marks it M if it stays and MR if it’s removed after welding. AWS A2.4 draws the rectangle and puts R inside it when it comes off.
A half-circle opposite the butt weld symbol is a back weld, a run on the root side. It sits on the root of the butt symbol. The symbol doesn’t tell you whether that run goes in before or after the main weld. That comes from the tail, a note or the WPS.
A filled half-circle asks for complete penetration from one side with visible root reinforcement. AS 1101.3 calls it complete penetration from one side and puts the reinforcement height on the drawing. AWS calls it melt-through and allows the height to be written left of the symbol.
The small marks that cost the most
The site flag
A flag at the bend of the arrow means the weld is made on site, not in the shop. AS 1101.3 calls it a site weld and draws the flag pointing away from the arrow. AWS calls it a field weld and lets the flag point either way. Either way it changes the job: access, position, weather, and a hold point that now happens on a scaffold.
The all-round circle
The weld goes all the way round the joint. On a base plate or an RHS end, that includes the corners nobody likes doing.
Contour and finish
The contour mark asks for a flat or flush, convex or concave face. The letter beside it says how to get there, and the letters don’t mean the same thing in both books:
| Letter | AS 1101.3 | AWS A2.4:2020 |
|---|---|---|
| C | Chipping | Chipping |
| G | Grinding | Grinding |
| M | Machining | Machining |
| R | Rolling | Rolling |
| P | Peening | Planishing |
| H | Not used | Hammering |
| U | Not used | Unspecified |
A contour mark with no letter means something different too. Under AS 1101.3 the contour is achieved by welding alone. Under AWS it can be achieved by any method. So a flush mark with no G on an Australian drawing is asking for a weld put down flush, not a grinder.
The tail
The process, a WPS number or a note. It doesn’t override the WPS, and an empty tail doesn’t mean anything goes.
What a weld symbol will never tell you
- The root face, or the radius of a U or J preparation.
- Which member gets the bevel, unless the arrow is cranked.
- Which way an unequal leg fillet faces.
- The process, unless it’s in the tail.
- Consumables, preheat, heat input, interpass temperature or run sequence.
- The weld category under AS/NZS 1554.1, the extent of NDT, or the acceptance criteria.
That’s what the welding procedure, the drawing notes and the inspection and test plan are for. The symbol is the ‘what’. The WPS is the ‘how’. The ITP is the ‘prove it’. If one of the three is missing, the weld is being made on someone’s memory. For how the category and inspection side works on structural steel, see our AS/NZS 1554 guide.
Five symbols read end to end
1. Fillet both sides, all round, site weld
A 6 above and below the line with a triangle each side, an all-round circle and a site flag. Read it as: 6 mm leg fillet on both sides of the joint, all the way round, welded on site. Typical of a column base plate.
2. Stitch weld, staggered
A 5 mm fillet each side, 50-150 on both, the other-side symbol offset along the line. To AS 1101.3:2026: 5 mm leg, 50 mm welds with a 150 mm miss, staggered from side to side. The same symbol on an AWS drawing gives 50 mm welds at 150 mm centres.
3. Partial penetration bevel on a tee
A bevel symbol below the line, 12 (9) to its left, 45° below it, 2 inside it, the arrow cranked to the stem. Read it as: bevel the stem only, 45°, 12 mm deep, 2 mm root gap, 9 mm design throat. Partial penetration.
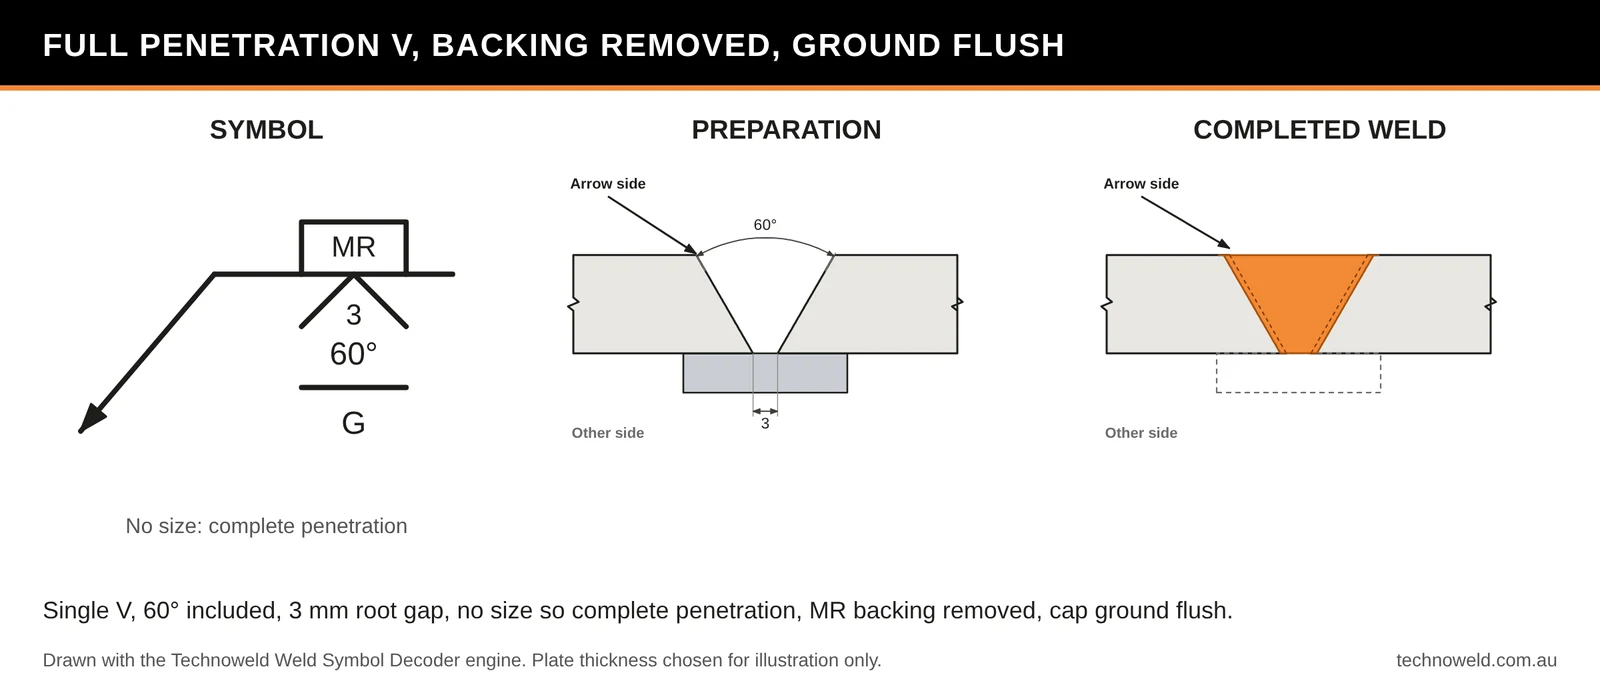
4. Full penetration V with backing removed, ground flush
A V below the line with 60° and 3 and no size, MR opposite, a flat contour mark and G. Read it as: single V, 60° included, 3 mm root gap, complete penetration, backing bar removed after welding, cap ground flush.
5. A European drawing, ISO System A
A solid line with a dashed line below it, a triangle on the dashed line, and a5 to its left. Read it as: other side, 5 mm throat fillet, which is about a 7 mm leg. Read it the AS 1101.3 way and it becomes a 5 mm leg on the arrow side. Wrong side, and half the weld metal. ISO 2553 is next on the decoder’s list. Until it’s in, this one’s on you.
Got one of these on your own drawing? Photograph it and drop it into the Weld Symbol Decoder. Set the standard, decode it, then flick between Prep and Welded to see the joint before and after. Anything the symbol leaves open comes back flagged as a check with the drafter, which is your RFI half written.
Questions people ask about weld symbols
What is the Australian standard for weld symbols?
The Australian standard for weld symbols is AS 1101.3, Graphical symbols for general engineering, Part 3: Welding and non-destructive examination. The current edition is AS 1101.3:2026, which supersedes AS 1101.3-2005 (R2018). Use the edition your contract or drawing names.
What is the symbol for a stitch weld?
A fillet weld triangle with two numbers to its right: the length of each weld, a hyphen, then the spacing. Under AS 1101.3:2026 the second number is the miss between welds. Under AWS A2.4 it is the pitch, centre to centre. Opposite symbols mean chain, offset symbols mean staggered.
What is the symbol for a full penetration weld?
A full penetration weld is shown by a butt weld symbol with no depth and no size beside it, under both AS 1101.3 and AWS A2.4. CP in the tail (AS 1101.3) or CJP (AWS A2.4) also asks for complete penetration and leaves the joint preparation to the fabricator’s welding procedure.
What is the difference between a and z on a fillet weld symbol?
They are ISO 2553 prefixes. z is the leg length and a is the throat thickness. An a5 fillet is about a 7 mm leg, so reading a as leg length undersizes the weld. AS 1101.3 and AWS A2.4 use no prefix: the number is the leg.
Can Australian drawings use AWS or ISO weld symbols?
Yes, if the drawing says so. Read every symbol to the standard the drawing was produced to, not the one you trained on. If the drawing doesn’t name a standard, raise an RFI before anything is cut.
Does a contour symbol mean the weld has to be ground?
No. A contour mark only asks for grinding when it carries a G. Under AS 1101.3, a contour mark with no letter means the shape is achieved by welding alone. Under AWS A2.4, no letter means any method.
Read it once, read it right
A symbol that can be read two ways will be. The fix is cheap: find the book, read the line, then read the numbers, and ask about anything the symbol leaves out before the first cut.
Technoweld develops welding procedures and carries out NATA accredited welding inspection to AS/NZS 1554 and AWS D1.1 (NATA Accreditation No. 19221). If your drawings, your WPSs and your floor aren’t reading the same symbol the same way, talk to us.
Disclaimer
This article is general information for training and reference. It is not engineering advice, and it does not replace the drawing, the specification, the edition of the standard named in your contract or the approved WPS. AS 1101.3:2026, AWS A2.4:2020 and ISO 2553:2019 are summarised and interpreted by Technoweld, not reproduced, and Technoweld is not affiliated with or endorsed by Standards Australia, the American Welding Society or ISO. Clause and edition references were current when this article was published on 19 November 2026, and standards change. To the extent permitted by law, Technoweld Pty Ltd accepts no liability for any loss, damage, cost or rework arising from reliance on this article. Nothing here excludes, restricts or modifies any right or remedy you have under the Australian Consumer Law that cannot lawfully be excluded. See our Terms and Conditions.